If you are a Drupal developer and you want to create your next project using Node.js and NestJS then look no further. In this article, you will see how similar Drupal 9 and NestJS are, at least when it comes to structuring your project and some basic concepts.
But before we start, let's say a few words about NestJS. NestJS is a framework for building scalable Node.js server-side applications. It's built on top of ExpressJS (also a framework), and it abstracts away some of the boilerplate for a much more opinionated approach. It's extremely popular for building APIs and micro-services.
Both Drupal 9 and NestJS are opinionated frameworks. In simple terms that just means that you don't have to think much about structuring your project. An opinionated framework makes some assumptions about architecture and best practices. This speeds up your development time and makes sure that your project is well structured from the get-go.
Drupal 9 developers are used to create modules, services, routes, controllers, and to use annotations. And the same applies to NestJS developers as well.
I won't cover the installation process here, because you can find all the necessary information in the official documentation. Make sure that you have Node.js and npm installed and then follow the official docs.
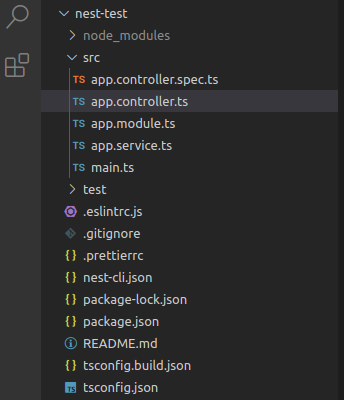
The initial directory structure after creating a new project looks something like this:
Let's talk a little about the most important files and directories.
The node_modules directory is just like the vendor directory in Drupal. This is where all your project's dependencies are installed and just like vendor this directory shouldn't be committed to your version control. The src and test directories are self-explanatory. Your custom code goes to the src directory and your tests to the test directory.
The package.json and package-lock.json files are just like composer.json and composer.lock files. To install new modules/packages in Drupal you have to use Composer, but for installing new packages for your NestJS app you can choose between npm, yarn, and pnpm. npm is the default package manager, so you should probably stick with it while you are learning Node.js and NestJS.
| Drupal | NestJS | |
| Major version | 9 | 8 |
| Package manager | Composer | npm |
| Package repository | https://packagist.org | https://www.npmjs.com |
| Install command | composer require package_name | npm install package_name |
Finally, if you take a look inside the src directory you will find the main.ts file which is the entry file that is used to create a NestJS application instance.
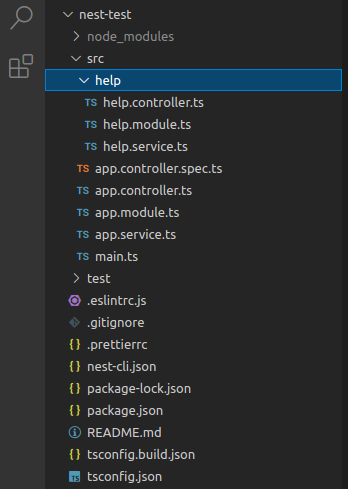
Now let's create a simple module called help. Start by creating the help directory inside the src directory, and then add the help.module.ts file:
import { Module } from '@nestjs/common';

@Module({
  controllers: [],
  providers: []
})
export class HelpModule {}
We don't have any controllers or providers (services) yet so corresponding arrays in the @Module() decorator (annotation in Drupal) are empty.
Services in Drupal are used for performing specific tasks in a reusable and decoupled way. The same applies to NestJS as well. Let's create a service by creating the help.service.ts file:
import { Injectable } from '@nestjs/common';

@Injectable()
export class HelpService {
  getHelp(): string {
    return 'Getting help!';
  }
}
Decorator @Injectable() is used to declare a class to be recognized by NestJS for dependency injection. Now edit the help.module.ts file and register the service by adding the class name to the providers array.
Let's proceed with our simple module development and add a controller. Create a new file called help.controller.ts and inject the help service:
import { Controller, Get } from '@nestjs/common';
import { HelpService } from './help.service';

@Controller()
export class HelpController {
  constructor(private readonly helpService: HelpService) {}

  @Get('help')
  getHello(): string {
    return this.helpService.getHelp();
  }
}
As you can see unlike in Drupal where we have a routing file, the route is created by using the @Get() decorator. To inject the help service you first have to import the service and then inject it with the class constructor. This is very similar to how the services are injected into Drupal controllers.
Now let's register the controller by editing the help.module.ts file and adding the class name to the controllers array. The help.module.ts file should now look like this:
import { Module } from '@nestjs/common';
import { HelpController } from './help.controller';
import { HelpService } from './help.service';

@Module({
  controllers: [HelpController],
  providers: [HelpService],
})
export class HelpModule {}
After adding the help module the directory structure should look like this:
To enable the help module edit the app.module.ts file and add the help module class name to the imports array:
import { Module } from '@nestjs/common';
import { AppController } from './app.controller';
import { AppService } from './app.service';
import { HelpModule } from './help/help.module';

@Module({
  imports: [HelpModule],
  controllers: [AppController],
  providers: [AppService],
})
export class AppModule {}
And that's it. Run the application by executing npm run start:dev command and visit the localhost:3000/help page. You should see the 'Getting help!' text or whatever you are returning from the service.
Is it worth it to learn NestJS? My answer is yes it is. If you want to start using Node.js then learning a good backend framework is really important. Is NestJS easy to learn? Well, that depends on your existing skillset. If you are an experienced developer then you will pick it up in no time.
If you are asking yourself should I use Express or NestJS, then my advice is to start with NestJS because it is based on a clearly defined architecture. How popular is NestJS? As of today (April 2022) it has 46k+ GitHub stars and over 1.3 million weekly npm downloads.


