Updated: Nov 16, 2019.
Please note that some info in this text is outdated and also there won't be part 2! Core REST API is not used for building decoupled sites anymore. Developers tend to use GraphQL or JSON:API these days.
In this blog post, we will create a simple decoupled website. To find out more about decoupled websites please visit the following link The future of decoupled Drupal. The back-end will be a Drupal 8 instance, and the front-end will be created in React JS.
This website will have the following features: create and login users, fetch user profile, fetch content and send contact messages. These features are enough to get you started. Once you see how easy it is to make a decoupled website, you can extend the demo, and create a website exactly how you want it.
You can see the demo here: druact.gorannikolovski.com
How to enable CORS?
CORS stands for Cross-origin resource sharing, and for security reasons, all modern web browsers restrict cross-origin requests initiated from within scripts. This means that you cannot use javascript to fetch data from different domain - scripts can only make HTTP requests to its own domain. This is a big problem if you are building a decoupled website that runs on a separate domain. Your front-end won't be able to talk to your back-end if they are not on the same domain.
Fortunately as of Drupal 8.2, this can easily be fixed. You will need full access to your server because you need to edit a file. Navigate to the following directory "sites/default" and open the "services.yml" file. In the case that this file doesn't exists, don't panic. By default, this file has to be manually created. Just copy and rename the existing "default.services.yml" file and you are all set.
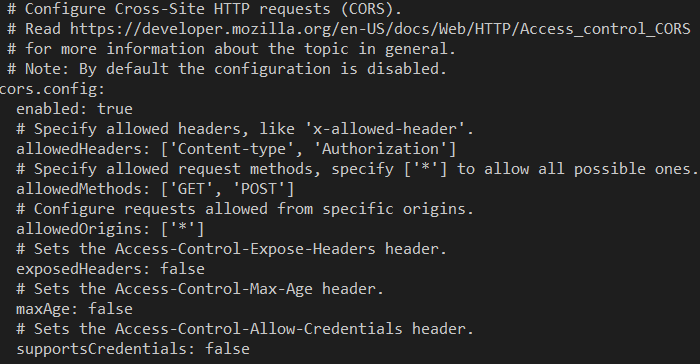
Now, you can enable CORS by opening the "services.yml" file and scrolling down to "cors.config" section. In this section, which is located at the bottom of the file, you need to find the key "enabled" and change its value to true. After this, you need to change three more things in this file:
- Key "allowedHeaders" should have the value: ['Content-type', 'Authorization']. This is used to indicate which HTTP headers can be used when making a request
- Key "allowedMethods" should have the value: ['GET', 'POST']. Since we will build a simple decoupled website these two methods are enough. If you want to implement additional functionality then you might need to specify additional methods
- Key "allowedOrigins" should have the value ['*'] or ['www.yourdomain.com'], depending on whether you want to allow access from all domains on the internet or just from one specific domain. You can also specify two or more domains by separating them with a comma
After changing this file, clear all Drupal caches. Remember, you need to enable CORS only if you are building a decoupled website where the front-end and the back-end are not on the same domain. If they are on the same domain, then you can skip this step.
How to enable RESTful Web Services in Drupal 8?
You must install three core modules: RESTful Web Services, Serialization and HTTP Basic Authentication, and download and install two contributed modules: REST UI and Contact message REST.
We will also need two additional contributed modules: Contact storage and Token. By using the Contact storage module we can store and see our contact messages in Drupal's UI. This is not required, but it's a nice feature to have.
Contributed REST UI module will help us to enable REST for different resources, like users, content and contact messages. After you have installed all seven modules, navigate to the page: "admin/config/services/rest" and enable the following four resources:
| Resource | Path | Description |
|---|---|---|
| Content | /node/{node} | Enable GET method, JSON format and Basic Auth |
| User | /user/{user} | Enable GET and POST methods, JSON format and Basic Auth |
| User registration | Enable POST method, JSON format and Basic Auth | |
| Contact message | /contact_message/{entity} | Enable POST method, JSON format and Basic Auth |
We are going to use these four resources to read content, create and login users and finally to send contact messages. To enable these resources just click Enable button next to the resource name and then select appropriate options.
Contributed Contact message REST module is used to implement sending contact messages via Rest service.
User permissions
We need to add two user permissions. Navigate to the page "admin/people/permissions" and add the following permissions to anonymous and authenticated users:
- "Access POST on Contact message resource"
- "Access POST on User registration resource"
In this demo, we are going to disable email verification for new accounts and we are going to allow visitors to create an account without administrator approval. So, head over to the page "admin/config/people/accounts" and update account settings.
Create a Rest View
The last thing we need is a REST View for the articles list. Go to the page "admin/structure/views/add" and create a new View. We don't need a page or a block for this view, just enable "Provide a REST export" and set the path to "/api/v1/articles/list". This View should return the Article content type, specifically two fields of Article content-type: ID and Title. Now create some articles, either manually or with the Devel Generate module.
Conclusion
After completing all described steps, we have a complete back-end side for our decoupled website. Now, you can set up all this by yourself, or you can install the following module:
Just install this module and you will have everything you need for the back-end side. It's that easy.
In the next part of this blog post, we are going to create the front-end side.


