Override admin template defined in a contrib module

Components

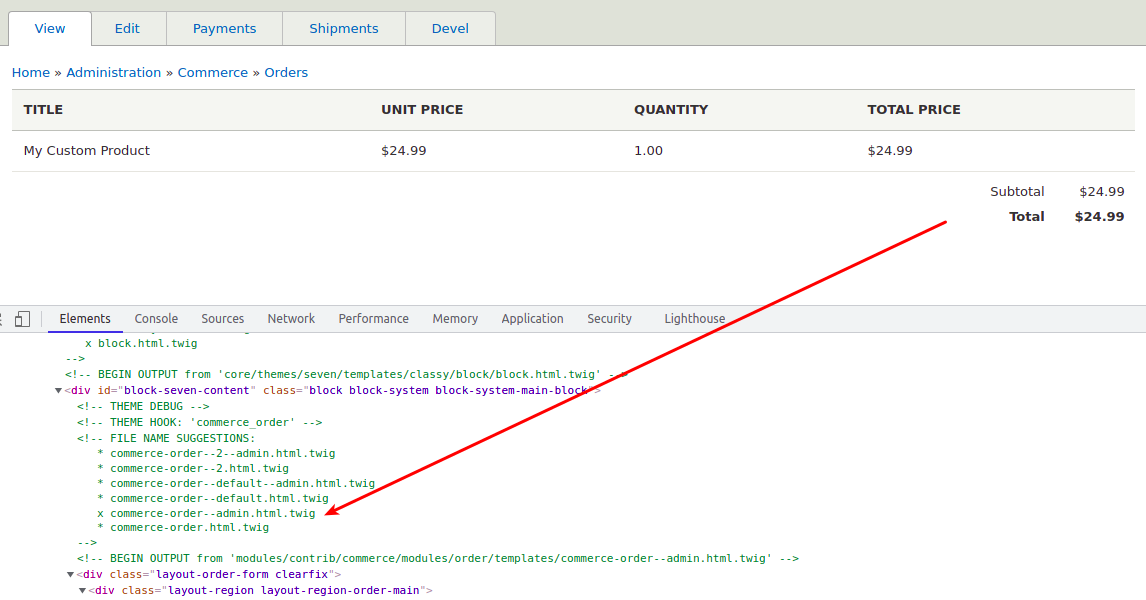
Let's say that you want to override the template for the order that is defined in the Commerce Order module. If you don't have a custom Admin theme then you have to override it in a custom module.

You can't do this in the custom user-facing theme, because that theme is not used for admin pages. So, you have to find out the template name by enabling theme debug and inspecting the HTML code.

Image

Now you can implement the hook_theme() hook like this:

/**
 * Implements hook_theme().
 */
function MY_MODULE_theme($existing, $type, $theme, $path) {
  return [
    'commerce_order__admin' => [
      'template' => 'commerce-order--admin-custom',
    ],
  ];
}

And the last step is to create a new Twig template in your custom module: MY_MODULE/templates/commerce-order--admin-custom.html.twig

Altering the username that is displayed for a user

Components

Thanks to the hook_user_format_name_alter() hook altering the username that is displayed for a user is really easy. Let's say that you have the First and Last name fields on the user entity. You can do something like this to alter the username:

use Drupal\Core\Session\AccountInterface;
use Drupal\user\Entity\User;

/**
 * Implements hook_user_format_name_alter().
 */
function MY_MODULE_user_format_name_alter(&$name, AccountInterface $account) {
  $full_name = [];

  $account = User::load($account->id());
  $first_name = $account->get('field_first_name')->value;
  $last_name = $account->get('field_last_name')->value;

  if (!empty($first_name)) {
    $full_name[] = $first_name;
  }

  if (!empty($last_name)) {
    $full_name[] = $last_name;
  }

  if (!empty($full_name)) {
    $name = implode(' ', $full_name);
  }
}

If you now try to get the username by using this $account->getDisplayName() you will see the new username that consists of the first and last name.

How to alter Read more link for a node

Components

If you want to alter the title of the Read more link or perhaps add some CSS classes, you can do that by using the hook_node_links_alter() hook.

use Drupal\node\NodeInterface;

function MY_MODULE_node_links_alter(array &$links, NodeInterface $entity, array &$context) {
  if (!empty($links['node']['#links']['node-readmore']['title'])) {
    $links['node']['#links']['node-readmore']['title'] = t('View Details');
    $links['node']['#links']['node-readmore']['attributes']['class'][] = 'view-details-link';
  }
}

You can do this just for some content types, by checking the bundle value: if ($entity->bundle() == 'article') {}

How to add a button to Drupal 8/9 Modal

Components

Creating a modal with a title and some content in Ajax callback is easy:

use Drupal\Core\Form\FormStateInterface;
use Drupal\Core\Ajax\AjaxResponse;
use Drupal\Core\Ajax\OpenModalDialogCommand;

public function ajaxCallback(array $form, FormStateInterface $form_state) {
  $response = new AjaxResponse();
  $response->addCommand(new OpenModalDialogCommand($this->t('Title!'), $this->t('Some content.')));
  return $response;
}

If you also want to display a button in the modal, just provide the third parameter like this:

$options = [
  'buttons' => [
    'button1' => [
      'text' => $this->t('Close'),
      'id' => 'close-button',
      'onclick' => "jQuery('.ui-icon-closethick').click()",
    ],
  ],
];

...
$response->addCommand(new OpenModalDialogCommand($this->t('Title!'), $this->t('Some content.'), $options));
...

As you can see, by clicking on this button the modal will be closed.

How to programmatically check Generate automatic URL alias

Components

If you want to programmatically check the Pathauto's Generate automatic URL alias checkbox you can do something like this:

use Drupal\pathauto\PathautoState;

$entity_type = 'node';
$entity_storage = \Drupal::entityTypeManager()->getStorage($entity_type);
$nodes = $entity_storage->loadMultiple();

foreach($nodes as $node) {
  $node->path->pathauto = PathautoState::CREATE;
  $node->save();
}

For terms just change the entity type to this:

$entity_type = 'taxonomy_term';

To uncheck the field instead of CREATE use SKIP constant:

$node->path->pathauto = PathautoState::SKIP;

In summary, the code snippets provided outline the process of programmatically toggling the automatic URL alias generation feature in Drupal using the Pathauto module. 

How to programmatically render entity form

Components

Programatically rendering entity form in Drupal 8, 9 and 10 is easy, provided that you want to render it using the default form mode.

// Load existing node
$node = \Drupal\node\Entity\Node::load(1);
// or create a new node
$node = \Drupal::entityTypeManager()->getStorage('node')->create(['type' => 'article']);

$form = \Drupal::service('entity.form_builder')->getForm($node);

If you want to render it using any other form mode like this for example:

$node = \Drupal\node\Entity\Node::load(1);
$form = \Drupal::service('entity.form_builder')->getForm($node, 'compact');

you will have to alter the entity definition and add your own form handler. Otherwise, you'll get the following error:

Drupal\Component\Plugin\Exception\InvalidPluginDefinitionException: The "node" entity type did not specify a "compact" form class.

To add your own form class you can use the hook_entity_type_alter hook like this:

/**
 * Implements hook_entity_type_alter().
 *
 * Alters the entity definition and adds our own form handlers.
 */
function MY_MODULE_entity_type_alter(array &$entity_types) {
  $form_modes = \Drupal::service('entity_display.repository')
    ->getAllFormModes();

  foreach ($form_modes as $entity_type => $display_modes) {
    if ($entity_type !== 'node') {
      continue;
    }

    $type = $entity_types[$entity_type];
    foreach ($display_modes as $machine_name => $form_display) {
      if (isset($type->getHandlerClasses()['form']['default'])) {
        $default_handler_class = $type->getHandlerClasses()['form']['default'];
        $type->setFormClass($machine_name, $default_handler_class);
      }
    }
  }
}

In summary, while rendering an entity form programmatically in Drupal 8, 9 and 10 is straightforward with the default form mode, using custom form modes requires altering the entity definition and specifying appropriate form handlers to avoid errors. 

How to get all field names of field type

Components

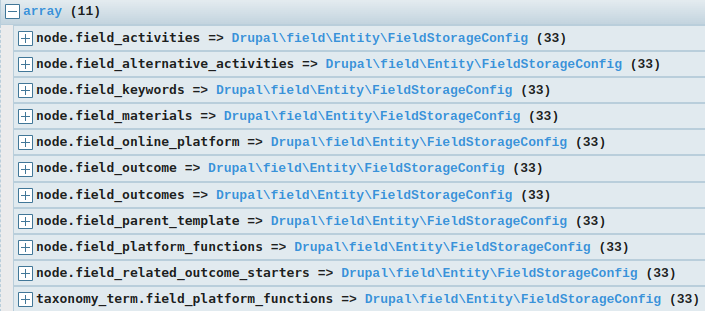
To obtain a list of all field names for fields of a specific type, such as image, you can use the entity_field.manager service:

$field_map = \Drupal::service('entity_field.manager')->getFieldMapByFieldType('image');

The $field_map array will contain a list of fields organized by entity type.

Image

In summary, the entity_field.manager service in Drupal can be utilized to fetch field names based on their field type, offering a systematic way to categorize and manage fields.

How to programmatically change order status

Components

Changing the order state in Drupal Commerce 2.x like this:

$order->set('state', 'canceled');
$order->save();

is not a good idea because you are not dispatching transition events. And some modules depend on those events. The proper way to change the order state is to apply state transition like this:

$order = \Drupal::entityTypeManager()
  ->getStorage('commerce_order')
  ->load(1);
$order->getState()->applyTransitionById('cancel');
$order->save();

You can find the list of transition IDs in the workflows file.

How to programmatically add a language

Components

Sometimes you have to add a new language in Drupal 8/9 programmatically. For example, maybe you need to write an update hook that will add a new language. This is how you can do it:

use Drupal\language\Entity\ConfigurableLanguage;

$language = ConfigurableLanguage::createFromLangcode('sr');
$language->save();

If you don't know the langcode, you can find it by inspecting the select box on the /admin/config/regional/language/add page. 

How to set price field value programmatically in Drupal Commerce

Components

Price in Drupal Commerce 2.x is not a number but a class. This class has a price number and currency code properties, and both are strings. So, to set the product price programmatically you have to first instantiate the Price class:

$price = new \Drupal\commerce_price\Price('9.99', 'EUR');

and then use created Price object to set the product price:

$product_variation = \Drupal\commerce_product\Entity\ProductVariation::load(1);
$product_variation->set('price', $price);
$product_variation->save();

To get the price number and currency code you can use appropriate getters methods:

$price_number = $price->getNumber();
$currency_code = $price->getCurrencyCode();

You can also create a Price object by using the static method:

$price = Price::fromArray(['number' => '9.99', 'currency_code' => 'EUR']);

In summary, in Drupal Commerce 2.x, prices are managed using the Price class, which encapsulates both the price number and currency code, allowing for programmatic manipulation and retrieval of product prices.